Tuesday, 16 April 2013

A most Awesome Awning

Now that we are a family of four, the already tight living arrangements in the camper van were going to be even more squeezed so we decided it was high time we got ourselves an awning.  We were convinced this was a top idea after our last summer holiday in the van, when our friend's camper van awning proved mightily handy for lobbing pushchairs and toys in.

We did some research on various forums as not many drive-away awnings are suitable for our camper as it has rear doors rather than a side sliding door.  The Movelite XLF seemed to come up trumps, with long straps going over the top of the van to seal the awning to the van.  It also had ample space for all of our stuff.

We purchased a second hand one via eBay and took it on our latest trip to Wales without checking it first, crossing fingers it was all ok. On unpacking, it was happy days as everything was there...apart from, we soon realised...tent pegs...  Unfortunately the campsite we were on wasn't well inhabited and the few other campers there didn't have any spares to lend us. Fortunately we travel with a mega tool box which includes a variety of useful screwdrivers, files and crowbars - we found a new use for these as temporary pegs for the awning...see below!!
Thank goodness for a well stocked tool box!

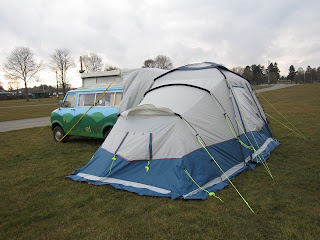
See below for a better view of the awning - you can see here that the big yellow straps secure it to the campervan. When you want to drive away you simply unpeg these and zip up the awning to secure it.


And here's the other side - this has the extra pod which has an inner tent creating two bedrooms - or the 'playroom' and the 'store room' if you're us!


The only downside was the unbelievable driving wind (and rain) that we had over the weekend at the campsite - the front strap which secures the awning across the top of the van vibrated loudly, and one of the sides wasn't tight into the van which meant there was some audible flapping one night. [Husband found solutions to both of these: twist the straps so they don't resonate in the wind; and take the straps to opposing sides of the van to pull it in tight]

Apart from that we consider it a great success and so useful - we are really pleased with it! Now to dry it out....

Monday, 15 April 2013

How we made a camper van baby bunk

Now that our toddler has graduated to using the proper bunks running the length of the camper van, rather than the coffin arrangement, and we have become a family of four, we had the dilemma of where to put our baby girl.  Originally, Autosleepers had a baby bunk as an optional extra but of course these aren't available now - so Husband set about researching on the internet in order to come up with a homemade design solution. 

Looking at the old Bedford design and some of the modern VW campervan baby bunk options, this is what we came up with (and we need to mention J.E. Matthews Blacksmiths in Northampton who supplied the raw material and painted the finished bars, all for £15!)

First thing: Some lengths of 22mm O.D., 1mm wall thickness steel tube and some 18mm steel bar. Cut the tube to approx length (half the width of the cab) and welded in a short length of bar.


These will slot together like so:


Step two: At the other end of the tube, weld a very short length of 18mm bar, drill the centre out to 6mm and insert 6mm bar which you then also weld in. Do this to both ends and these pips will locate into the pillars of the cab...


Step three: We used an old piece of wood dowel and a spring from eBay. This is inserted into the open tube and a small grub screw inserted into the side of the tube holds the dowel in place...


Next: Make four small brackets and screw to the A pillar (by the windscreen) and B pillar (by the seatbelt top mount) and drill out a 7mm hole where the pips will locate...


Then: Push the bars together and compress the spring in order to slot the pips into the brackets. Had to tune the length of the tube to get it just right...


And finally: get your Mum/Mother-in-Law to make up a hammock out of fairly strong fabric (this cost us about £12). She stitched the ends together so there was some kind of barrier to baby scootching up and over the end of the bunk.  She also doubled over the fabric to give it some extra strength. It had to be high enough to avoid the steering wheel but low enough to be comfortable and safe.  The final touch was adding a curtain across the cab so that baby could be screened off at night. And here's the end result!!  Our 7 month old baby slept pretty well in the bunk (it was the teething that caused any nighttime upsets!)

Comfy baby!

Happy 40th Birthday!!

We're not quite there yet ourselves but our superb camper van Trevor has reached the milestone of his 40th birthday!  Of course we always knew he'd make it to this grand age, even when he looked like this

We took our first trip of 2013 in Trevor this weekend just gone, and once we got set up on the campsite we celebrated with a nice birthday cake...our toddler even managed a rendition of "Happy Birthday to Trevor the Camper Van"! Congratulations Trevor, we hope you manage many more years to come (I think we'd be lost without you.....)

Yay! Let's Party!!